How to Add Excel Data to WordCruncher
1. Format Columns
Organize your columns into three sections: Levels, Text, and Attributes. While only the Text column is absolutely required, you'll get more out of WordCruncher searches and analysis reports when you include levels and attributes.

Level(s)
Organize your data by levels. You can have a maximum of 10 level columns. Format the header like this, making sure to include the colon: Level: ***.
Text
To the right of your Level columns, add the text column. Format the header like this, making sure you exclude spaces after the word Text: Text.
Attribute(s)
To the right of your Text column, add attribute columns. You can add a maximum of 14 attribute columns. Format the header like this, making sure to include the colon: Attribute: ***
Missing Data
Avoid leaving cells blank, if possible. Make sure not to leave cells in the Text column blank. If there are empty Level cells, you may have errors.
2. Sort Data
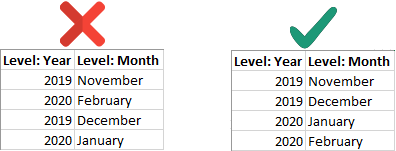
In a book, you wouldn't place Chapter 2 before Chapter 1. Make sure to sort your levels properly.
Use Excel to Sort Data
- Select the entire table.
- Open the
Data tab and select the Sort icon.
- Sort your first level column by A to Z or Smallest to Largest.
Note: Sometimes, you might not want to sort your data A to Z or smallest to largest. In the above example, sorting the Months column A-Z would sort December before November.
- If you have more than one level column, click the
Add Level button and add each column in order.
- Click
OK.
3. Save as CSV
Save your sheet as a CSV file.
4. Convert CSV to ETAX
Use the CSV to ETAX converter to convert your file.
5. Convert ETAX to ETBU
Open the WordCruncher Indexer to convert your ETAX to an ETBU file. Learn more about the Indexer here.
Errors
If there are errors, check your CSV column headers for typos. Double check that you have colons in the correct places. If you are still having problems, send us an email at wordcruncher@byu.edu with a description of the issue and the CSV file attached. We will do our best to help you out.
6. Open ETBU in WordCruncher
- Go to file >
Open Book.
- Select WordCruncher User Library.
- Go to
Options > Add Book.
- Select the ETBU. Click
Open.
- Change the book description, if desired.
- Click
OK.