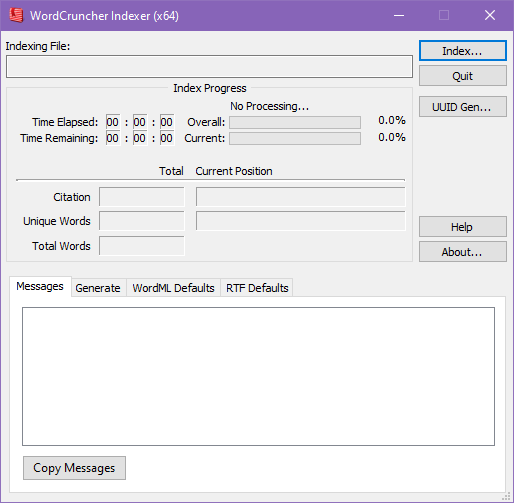
 WordCruncher Indexer
If you've ever had to search for a file with Window's File Explorer, you know how difficult it is. That's because your computer doesn't have an index of your files. An index keeps track of your files, so they're easier to find later. By converting your files into WordCruncher's index (called an ETBU file), you can find words and phrases faster.
Add Your Own Text
The WordCruncher Indexer allows you to index your files so that you can add your own texts to WordCruncher.
- Download the WordCruncher Indexer here.
- Convert your files to an ETBU file with the Indexer.
- Add the ETBU to your WordCruncher User Library.
Convert file to ETBU
The Indexer can convert TXT, XML 2003, RTF and ETAX files.
Other formats will need to be converted into one of the above formats prior to indexing.
- Open the Indexer and click
Index. - Set the language of your text file and the code page of your TXT file. At the bottom of this window, it
will display a sample of your text. Make sure your text looks correct.
(If you’re unsure or don’t know about character encodings, scroll to the bottom of the list and select UTF-8.)
- Click
Finishto convert to ETBU. Your file will now index, and you will have a new file with the extension of ETBU that can be added to WordCruncher. - Open the Indexer and click
Index. - Select all the TXT files and press
Open. - You’ll be asked if you would like to append the output to the same file. Click
Yes. - The Indexer won’t know which character encoding your TXT file is in. A dialog box
labeled Indexing Information will open. If all of your files are in the same character
encoding, check the box that says
Use these settings for all files that will be indexed. - Click
Next. - Set the language of your text file and the code page of your TXT files. At the bottom of this window, it
will display a sample of your text. Make sure your text looks correct.
(If you’re unsure or don’t know about character encodings, scroll to the bottom of the list and select UTF-8.)
- Click
Finish. - Your files will now index, and you will have a new file named AppendedOutput.etbu that can be added to WordCruncher.
- Save your Word document as an XML 2003 file.
- Open the Indexer and click
Index. - Select the file. Your files will now index, and you will have a new file with the extension of ETBU that can be added to WordCruncher.
- Convert the PDF to DOCX.
- Open the Indexer and click
Index. - Set the language of your text file and the code page of your files. At the bottom of this window, it
will display a sample of your text. Make sure your text looks correct.
(If you’re unsure or don’t know about character encodings, scroll to the bottom of the list and select UTF-8.)
- Click
Finishto convert to ETBU. Your files will now index, and you will have a new file with the extension of ETBU that can be added to WordCruncher. - Format your columns according to the CSV to ETAX Converter page.
- Drag your file onto the page and download the ETAX file.
- Open the Indexer and click
Index. - Set the language of your text file and the code page of your files. At the bottom of this window, it
will display a sample of your text. Make sure your text looks correct.
(If you’re unsure or don’t know about character encodings, scroll to the bottom of the list and select UTF-8.)
- Click
Finishto convert to ETBU. Your files will now index, and you will have a new file with the extension of ETBU that can be added to WordCruncher. - Click the Index button in the upper-right corner.
- Select the BYB, ETA, or ETB file and press
Open. - Your files will now index, and you will have a new file with the extension of ETBU that can be added to WordCruncher.
How To
You can compile multiple TXT files together into one WordCruncher book!
The process to append TXT files together is similar to indexing one TXT file, but there are some extra steps.
How To
If you have DOCX files, they can be saved as RTF or XML 2003 by saving them into one of these formats within Word.
How To
If you have PDFs, these can be converted to DOCX with programs like PDF2GO or Adobe Acrobat. Some PDFs might be images that first need optical character recognition to recognize the text.
How To
Excel sheets can be saved as CSV files and then converted into ETAX files with our web tool here.
How To
Older versions of WordCruncher files (such as BYB, ETA, and ETB files) can be indexed to generate the newer file formats, ETAX and ETBU.
How To
Add Your File to WordCruncher
Once you've converted your file into an ETBU, you can add them to your personal user library in WordCruncher.
How To
- Go to
File > Open Book... - Click on
WordCruncher User Library - Click on
Options > Add Book...and select the ETBU file.
Error Messages
When indexing a file, your file may not index properly. The messages will try to provide
information in the Messages tab to help identify problems with your file.
- Warnings are indicated with <WRN>. Warnings don’t stop the file from indexing completely, but they might need to be resolved.
- Errors are indicated with <ERR>. Errors also don’t stop the file from indexing completely, but they may affect your display or reference levels within WordCruncher.
- Fatal errors are indicated with <FTL>. Fatal errors stp the file from indexing, and they must be resolved before the index will complete.
- Find the line and character number in the warning message. It looks something like 4[62] (for line 4, character 62).
- Open the ETAX file in a text editor like Notepad++ and go to the line and character. Usually
CTRL + Gwill let you jump to a specific line faster. - Look for the problem, and fix it in the original document. Some error messages have specific solutions that you can solve in the next section.
- You have not defined all of the markup codes in the EPOSX. Use the EPOSX documentation to define the markup codes used in your file.
- The special character used to indicate part of speech is within the text. For example, you may be using an underscore to indicate part of speech. By having a token like "main_program" in your text, the indexer will try to use program as a markup code. To fix this, wrap the part of speech special character with <ch> </ch> tags, which will make it a hard character.
See this section for solutions to some of these problems.

There are over a hundred possible error messages that could occur during either of the two main stages of the indexing process (parsing and generating).
If there are any problems during the parsing stage, it will indicate the line and character location within the ETAX file that is generated. To identify problems during the parsing stage:
If there are any problems during the generating stage, you won’t be given a line and character location, but you will be given some information about the problem that will help you locate it.
Below are some of the most common messages, what they mean, and how to fix them.
Fatal Errors
Illegal qualified name character.
Your text includes a character that is not allowed in an XML document. These generally include the symbols &, <, and >. You should replace them with character entity references. For example, & could be replaced with &. For a full list of character entity references, search for a character on this website and replace the character with the defined HTML-code.
Unexpected end of input.
If you're indexing an ETAX file, it should end with </etax>. Make sure that this is at the end of your file.
Warnings
Invalid or missing book ID.
Each book should have a unique ID. Simply add the attribute id to the root tag <etax> and set its value to a unique UUID. You can
generate a unique UUID with the UUID Gen... button in the indexer.
Paragraph or table size exceeds 30000 characters. Starting new paragraph or table.
A paragraph's limit is 30,000 characters. This will automatically split any paragraph that exceeds 30,000 words. The Indexer won't split a word, but it may split a sentence. Divide long paragraphs to resolve this warning.
The number of child levels exceeds 4000 near location '%s'. This is highly discouraged.
This usually occurs when you have more than 4,000 paragraphs below a single parent heading. Having more than 4,000 tends to slow down the Viewer. To resolve this, divide your levels more to break up sections of text that have more than 4,000 child levels. If you have more than 4,000 references on level 1, this slows down the Viewer significantly.
Unrecognized part of speech markup: <markup code here>.
Every markup code for part of speech needs to be defined in the EPOSX. This could show up for two reasons:
Settings
- Number by level - Reset the paragraph number back to 1 every time a parent level (e.g. chapter) changes. This causes the paragraph number shown to be relative to the parent (e.g. 5th paragraph in this chapter).
- Continuous numbers - The paragraphs are numbered, starting with 1, from the start of the document and never reset to 1.
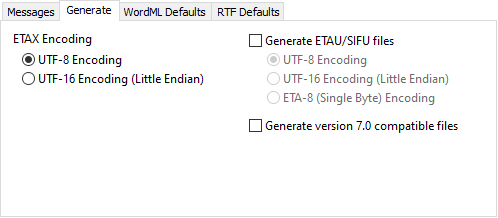
ETAX Encoding
An ETAX file is a text-editable XML version of the file. This is generated whenever you're converting a file. When converting an RTF or Word XML (2003) file, generic settings will be added to the WordCruncher ETBU. These settings can be changed within the SIFX portion of the ETAX file.
| Option | Description |
|---|---|
| UTF-8 Encoding | ETAX file is written with UTF-8 encoding |
| UTF-16 Encoding (Little Endian) | ETAX file is written with UTF-16 encoding |
Generate ETAU/SIFU files
ETAU and SIFU files are older versions of the ETAX and SIFX files.
| Option | Description |
|---|---|
| UTF-8 Encoding | ETAU file is written with UTF-8 encoding |
| UTF-16 Encoding (Little Endian) | ETAU file is written with UTF-16 encoding |
| ETA-8 (Single Byte) Encoding | ETAU file is written with ETA-8 encoding |
Generate version 7.0 compatible files
This creates files that are compatible with older versions of WordCruncher. Some elements available to version 7.1 but not in 7.0 will be ignored.
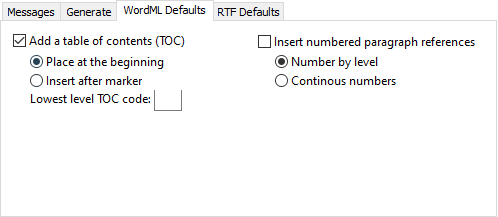
Add a table of contents (TOC)
A table of contents will be added to your file based on the outline levels used in the Word file.
| Option | Description |
|---|---|
| Place at the beginning | A table of contents with links to level 1 references is added at the beginning of the file. |
| Insert after marker | A table of contents with links to level 1 references is added at a specific marker. |
| Lowest level TOC code | The lowest level usually refers to the paragraph level. In the ETAX documentation related to level types, each level type must be given a one-letter code. The default is p, but this can be changed with this setting. |
Insert numbered paragraph references
If checked, this will add a reference level for each paragraph.
| Option | Description |
|---|---|
| Number by level | The paragraph number resets back to 1 once it hits a higher reference level, like a new chapter or section. |
| Continuous numbers | The paragraph number does not reset back to 1 once it hits a higher reference level, like a new chapter or section. |
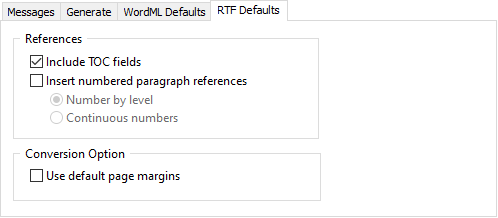
References
| Option | Description |
|---|---|
| Include TOC Fields |
The RTF conversion process adds all TOC fields as references into the WordCruncher book. |
|
Insert numbered paragraph references |
A numbered reference is created at the start of every paragraph. The zero point for this number is determined by the setting of the next two radio buttons. |
Conversion Option
| Option | Description |
|---|---|
| Use default page margins | If this option is not selected you will see page margins surrounding your text in a WordCruncher text window. This much white space normally appears out of place in a text window. Instead of the normal 1 inch margins found in printed documents, this option causes a margin of about 1/8th inch in the text windows. |