WordCruncher Monthly
Adding Metadata to Your Corpus
We are entering an age when there is so much information about a text that you can literally analyze text in a million different ways. Researchers here at BYU are interested in looking at changes in language over time, differences in word usage between genders, and much more. To do this, we need more than just text files—we need metadata.

Metadata are pieces of data that can be attributed to text. For example, we could categorize a text as a newspaper, a magazine, or a spoken interview. This text genre categorization is a piece of metadata. You can embed metadata to your text with WordCruncher attributes and then filter your searches based on the embedded text. Imagine you have a corpus of Tweets. If you want to limit your searches to Tweets with more than 10 retweets, you will need to embed metadata into every tweet so that WordCruncher knows what to search for.
But what’s the easiest way to embed attributes? To get started, you can take these three easy steps:
- Organize your data into a table
- Convert your data
- Filter searches with attribute bounds

1. Organize your data into a table
The WordCruncher Indexer is currently only designed to convert file formats like Word XML and TXT files. That’s because it was originally designed for books. However, it’s much easier to embed attributes onto text in a tabular format such as a CSV.
You can take a look here for more details on how your CSV file should look, but here’s a brief explanation:
- You should have a few columns at the beginning of your table that organizes your texts into some kind of structure. If your data is sorted by date, this could perhaps be Year, Month, and Day.
- You should have a column for the text, with ideally one paragraph (or less) in each row.
- You can have up to 14 different types of attributes, so you can add up to 14 columns of metadata.
By the way, if your data has any characters outside of a-z like ñ or é, you should use Google Sheets to export your CSV. That’s because Microsoft Excel doesn’t support characters used outside of ASCII, so your text will look corrupted outside of Excel.
2. Converting your CSV
The end goal is to get your CSV into a WordCruncher ETBU file. You can do this by dragging and dropping your file onto the CSV to ETAX converter page.
Once you convert your CSV into an ETAX file, use the WordCruncher Indexer to convert the ETAX file into an ETBU. Then you can add it to WordCruncher!
3. Filter searches with attribute bounds
With your CSV file now in WordCruncher, you can now do searches based on the metadata you’ve added.
Add your file to your bookshelf and open it. In a search window, type in your search term.
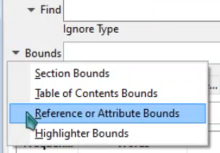
Go to Bounds > Reference or Attribute Bounds.
Select the attributes you would like to filter your search with and click “Insert Item(s) to Bound.”