Book Options
Book Options are a set of user preferences that are specific to a book. Each book has its own default settings related to display options, sections, note files, and custom word lists. You can modify these settings based on you preferences.
BookSets also have the same options for each individual book contained within it, but they also have options for synchronizing, layout, and word lists.
To access Book Options, navigate to Book > Options... Note that the Book menu is only visible when the main book window is open.
Change the Layout of a Bookset to Columns
If you would prefer to see footnotes in a column, try changing the layout of your bookset to columns!
Display
From the Display tab you can change the way the following elements appear in text windows.
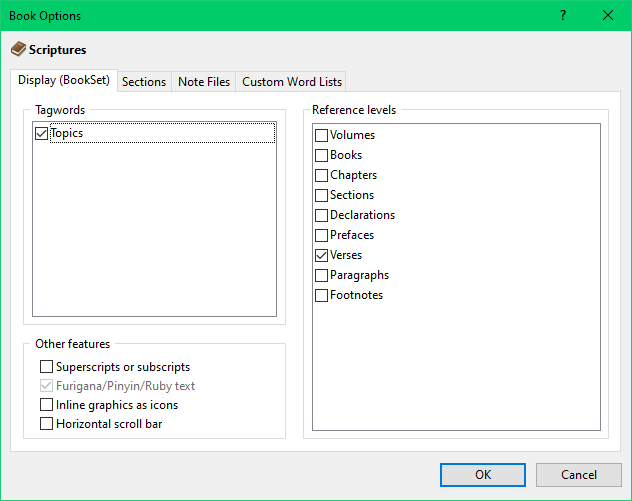
Tags are explanatory codes that categorize a word (for example, by part of speech or definition). A listed tag may not be applicable to the book you are using.
Reference-level codes are added to identify different parts or sections of a book. You may wish to experiment with showing and hiding these reference levels to see what data is shown with each level.
Show or hide superscripted and subscripted characters.
Show or hide ruby text (small textual annotations above other text that is used in some books), an important feature in Japanese text.
Show inline graphics as icons.
Show or hide the horizontal scroll bar at the bottom of the text window.
Some books have multiple table of contents (TOC) that store different reference levels. For example, the main table of contents may be organized by year, month, and day. A secondary table of contents may be organized by page number. You can switch between each TOC with the dropdown menu.
Reposition other books (where possible). Select this option if you want other similar books to reposition whenever you scroll or navigate in this book. Allow other books to reposition this book. Select this if you want this book to reposition whenever you scroll or navigate in another similar book.
Sections
You can create sections for a book that can be used to form bounds for searches and limit the scope of the Vocabulary Frequency Distribution and Search Vocabulary reports. This is similar to Table of contents bounds; however, you can predefine the bounds to be used multiple times without manually checking the desired reference levels.
The section list panel on the right shows a list of all current sections. The parts in selected section shows all the reference levels that are within the currently highlighted section.
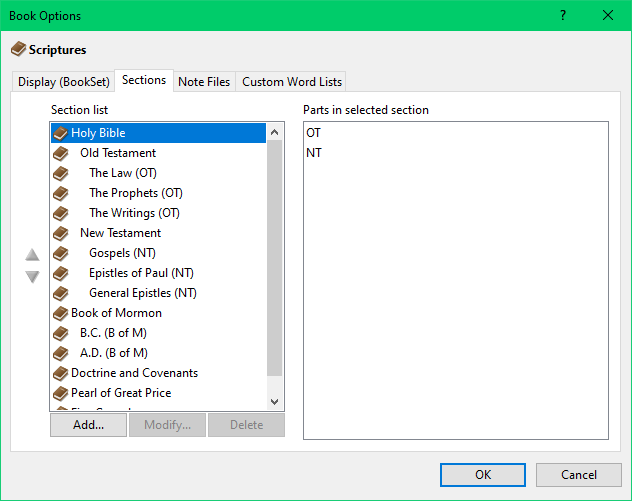
You can add a section by clicking the ADD… button under the section list panel. This will open a dialog menu to edit a section.
You can edit a name in the enter section name input.
You can check any reference level to add it to your section. Press the + box next to any reference level to expand its contents.
Once you’ve selected the sections, press the OK button to save the section. This section can now be used in the Sections bounds of the search tools or multiple other reports.
If you need to modify a section’s contents, select the section in the section list and click the Modify… button and check or uncheck reference levels. Press the OK button to save the changes to the section.
If you want to delete a section, select the section name in the section list and click the delete button.
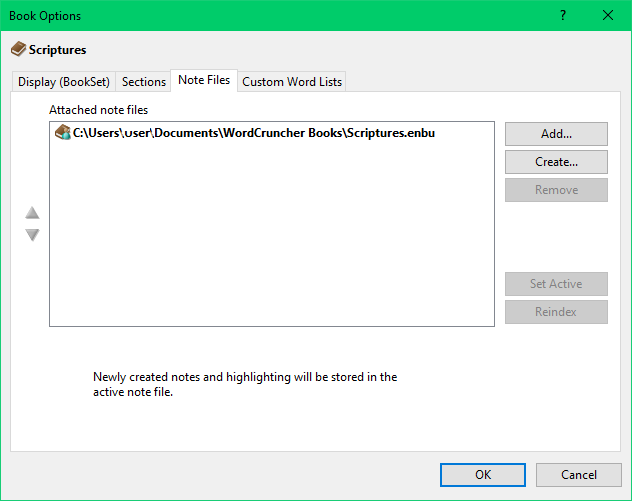
Note Files
From the Note Files tab, you can:
- See a list of note files attached to the book and where they are located on your computer so you can share or backup your notes.
- Change the order of the note files in the list.
- Create a new note file and attach it to the book.
- Attach an existing note file to the book. This allows you to reattach your notes or to attach notes made on another computer or by someone else.
- Remove a note file from the book. (This does not delete the note file; it just detaches it from the book.)
- Specify which note file you want new notes to be stored in (the "default note file").
Some users have asked for how to sync notes and highlighting between computers. This is currently not high on our development list, but an alternative is to move your note files into a cloud drive like OneDrive. Here are some basic steps to do this:
- Identify where your note files are within the Note Files tab. They are usually saved in C:/Users/{username}/Documents/WordCruncher Books/{book_name}.enbu.
- Move the ENBU file(s) to a folder in your cloud drive.
- In the Note Files tab, click the Add button and select the ENBU file(s) from your cloud drive.
- Select the new note file(s) under Attached note files and press the Set Active button.
- Select the old note file(s) under Attached note files and press the Remove button.
Note: Cloud drive programs usually take a few minutes to sync files. If you try to add notes/highlighting on different computers simultaneously, then this can cause syncing or saving errors. Because of this, it may be better to create a separate note file for each computer and add each individual note file to the Attached note files.
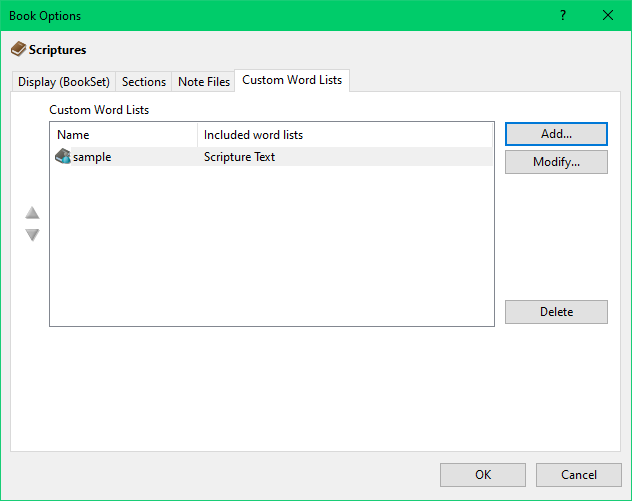
Custom Word Lists
The bottom of the Word list dropdown menu in the search window says <add or edit custom word lists…>. Clicking on that option opens this tab. Here, you can add, modify, or delete custom word lists.
When clicking the Add or Modify button, you’ll be prompted to enter a name for the word list. This is the name that will show up in the word lists drop down menu in the search window.
Then, you can select the word lists that you want to include in the custom word list. This is generally useful for combining one or two wordlists, but it’s unnecessary to add all to a word list, since All text is already a default option for all books.
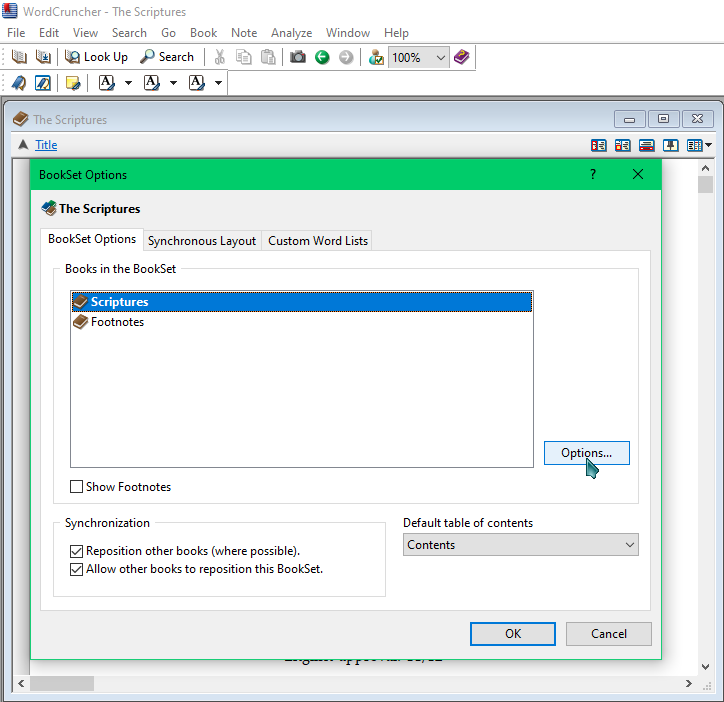
BookSets
Some books are combined into a BookSet. Most commonly, a file that contains the book text and a file that contains the footnote text are put together. BookSets have the same options as other books, but there are three additional tabs that relate to BookSets specifically.
In the properties for BookSets, you can select the books you want to include in a BookSet and access the BookSet Options dialog box. To open the properties, go to File > Open Book. Then, select a BookSet within your bookshelf and go to Options > Properties. For more info on BookSets, click here.
From the BookSet Options tab you can:
- See a list of books in a BookSet.
- Change the options for a book in the BookSet. To do this, select a book name and click the Options... button.
- Select synchronization options for this BookSet.
- Reposition other books (where possible). Select this option if you want other similar books to reposition whenever you scroll or navigate in this book.
- Allow other books to reposition this book. Select this if you want this book to reposition whenever you scroll or navigate in another similar book.
From the Synchronous Layout tab you can:
- Specify how you want the books in the BookSet to be arranged on the screen.
- See the possible pane arrangements for this BookSet.
- When a footnote book is part of the BookSet, select how and where to show its pane when footnotes are displayed.
- Click on the down arrow of the dropdown menu slightly below the tab title.
- From the list, select "Show layout when footnote panes are displayed".
- In the box labeled Books in the BookSet is a numbered list of books. The numbers correspond to a diagram on the right that shows how the book panes are currently arranged. To change how the books are assigned to panes, click one of the book names, and click the up or down arrows to the right of the list. This will reorder the books and change the pane number assigned to that book.
- In the box labeled Pane numbers and sizes is a diagram of the pane layout currently selected. You can increase or decrease the space given to each pane by clicking and dragging the borders of the panes.
- In the box labeled Desired orientation are a set of all possible pane layout diagrams. Click on the orientation you wish to use for this BookSet.
- Select the footnote book and click on the check box labeled Footnotes pane.
- When you have finished the pane layout when the footnote pane is hidden, click on the down arrow of the combo box and from the list select "Show layout when footnotes panes are hidden or not defined".
- Repeat the process of changing the book order, pane size and pane orientation until you are satisfied with the results.
- When you are finished, click OK.
- Click on the down arrow of the dropdown menu slightly below the tab title.
- From the list, select "Show layout when footnote panes are hidden or not defined".
- In the box labeled Books in the BookSet is a numbered list of books. The numbers correspond to a diagram on the right that shows how the book panes are currently arranged. To change how the books are assigned to panes, click one of the book names, and click the up or down arrows to the right of the list. This will reorder the books and change the pane number assigned to that book.
- In the box labeled Pane numbers and sizes is a diagram of the pane layout currently selected. You can increase or decrease the space given to each pane by clicking and dragging the borders of the panes.
- In the box labeled Desired orientation is a set of all possible pane layout diagrams. Click on the orientation you wish to use for this BookSet.
- When you are finished, click OK.
This menu is the same as the Custom Word Lists tab for individual books, but you can combine word lists from any of the books included in the BookSet.
Reference Books
From the Reference Books tab you can assign reference books (such as dictionaries and topical guides) to another book in your library, as well as see a list of the reference books assigned to a book. To access this menu, go to File > Open Book and select a book. Then, click on Properties... in the drop-down menu. In the window that opens, select Options > Reference Books tab.